Over and Under or around the sides

Post here information about your own engineering projects, including but not limited to building your own car or designing a virtual car through CAD.
User avatar
greenpower dude reloaded
6
Joined: 29 Dec 2005, 20:03
Location: Portsmouth, UK
Contact:

Re: Over and Under or around the sides

Post

Mould and then a body out of that, I've spent too many hours on CFD for it all to be ruined by a hideously rough surface. Although it may help with the tail in plan view, it tapers a bit too sharp but a Kamm always incresed drag
______________________________________

User avatar
flynfrog
Moderator
Joined: 23 Mar 2006, 22:31

Re: Over and Under or around the sides

Post

that will allow you to use a core in your layup and make it really light.

or you could build it out of metal

http://www.jalopyjournal.com/forum/show ... p?t=431553

User avatar
greenpower dude reloaded
6
Joined: 29 Dec 2005, 20:03
Location: Portsmouth, UK
Contact:

Re: Over and Under or around the sides

Post

May be a core in the next iteration... but there is no point in this version. I've got 10m2 of 200g woven roving so i'll be using that for this one.

I quite fancy using Ali honeycomb in the next vehicle (which will be quite a bit bigger/more powerful)

Anyone got any good tips for a good finish on this plug?
______________________________________

User avatar
flynfrog
Moderator
Joined: 23 Mar 2006, 22:31

Re: Over and Under or around the sides

Post

you could use a mold primer on it but unless you have a good spray gun and know what you are doing you will make more work for your self. I would simply brush on a coat of resin then wet sand and buff as needed make sure you get a good release on it and it should pull free ok as long as your draft it right

BreezyRacer
2
Joined: 04 Nov 2006, 00:31

Re: Over and Under or around the sides

Post

Get your plug as nice as you can and then wrap it with shrink wrap .. maybe even two layers if you can do it nicely. The mold should come right off then.

marcush.
159
Joined: 09 Mar 2004, 16:55

Re: Over and Under or around the sides

Post

hi luke,

as you stated you used plaster as modelling material ,and stanley tools have the right tools to work on this:
It is called Surform , also known as cheesegrater file...for bondo it is wearing too quick and you have to use it before the bondo really gets hard ,but it is ideally suited for plaster .It is available in all sorts of length and shapes and all is really working the plaster quick and precise without creating more dust than necessary..
sanding would be horrible,as it clocks the paper and you are always standing in the middle of a cloud of dust.. :mrgreen:
the files are available in flat and concave and convex shapes round as well so it should be faiurly easy to get the right shapes..

example:

http://images.google.de/imgres?imgurl=h ... s%3Disch:1

User avatar
greenpower dude reloaded
6
Joined: 29 Dec 2005, 20:03
Location: Portsmouth, UK
Contact:

Re: Over and Under or around the sides

Post

Since Flyn mentioned it the other day, I looked in to the Surform It turns out my father had one all along! I've only spent a few hundred hours sanding moulds for various cars but there you go.

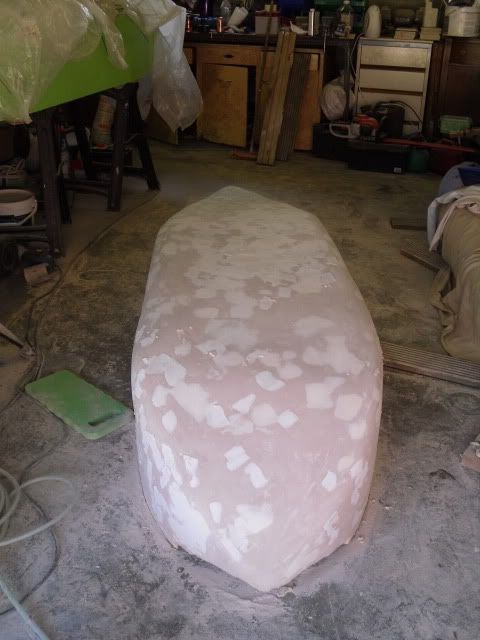
Laura has been out in the garage sanding all day today whilst i've been at work (150miles away, hence the often slow progress)and here is the result,
Image

quite a bit smoother but a long way to go yet, certainly no chance for the first race I wouldn't have thought but its rediculous challenges like that, that really get me excited!
______________________________________

Carlos
11
Joined: 02 Sep 2006, 19:43
Location: Canada

Re: Over and Under or around the sides

Post

For moldless foam and composite construction techniques I recommend these 2 books which are available in the UK, try amazon or used book sellers on the web.
http://aeronautpress.com/index.html

BreezyRacer
2
Joined: 04 Nov 2006, 00:31

Re: Over and Under or around the sides

Post

Oh man! Don't tell me you used bondo on your plug. It's damn hard to sand. Drywall compound sands much nicer and is very easy to patch up and it dries fast too. A foam core is and drywall compound really speeds things up.

User avatar
greenpower dude reloaded
6
Joined: 29 Dec 2005, 20:03
Location: Portsmouth, UK
Contact:

Re: Over and Under or around the sides

Post

Mouldless does look great but I started this a very long time ago just never got round to finishing it.

It is plaster dw I didn't go near bondo breezy
______________________________________

User avatar
flynfrog
Moderator
Joined: 23 Mar 2006, 22:31

Re: Over and Under or around the sides

Post

spray a guide coat of a light mist of a darker color of spray paint on there before you sand to show you low spots.

http://www.ehow.com/video_2200685_apply ... ation.html

User avatar
greenpower dude reloaded
6
Joined: 29 Dec 2005, 20:03
Location: Portsmouth, UK
Contact:

Re: Over and Under or around the sides

Post

nice tip flyn, I'll give that a try, I bought some spray the other week for something else.
______________________________________

Carlos
11
Joined: 02 Sep 2006, 19:43
Location: Canada

Re: Over and Under or around the sides

Post

Maybe OT - I know you thought of it probably, if you cut out a template of those corner radius to 'pull' drywall compound. I thought it might be bondo too, but I knew you wouldn't use that, it would be a horible job to do something that size, I thought it was modellers clay, like they used in Detroit styling studios, here in N America drywall mud is bright white. Back in the day we didn't have surfoam tools, we used wood rasps. Actually I had to post to confess I have never been able to spell it mould ... always mold, thanks for the help on that :)

marcush.
159
Joined: 09 Mar 2004, 16:55

Re: Over and Under or around the sides

Post

I feel so sorry for you.. this looks like a long long job .

as modelmaker ,I can only advice to not work the whole body all the time but restrict your efforts to certain parts of it first ,get these parts to the right shape and flow and then move on .,eg start at the front left wheelwell ,make templates and work the right wheelwell and move strategically so you can blend your efforts into a complete right smooth shape.
Working without templates to measure up your effort will not lead to good results eye sight is not enough you need something to gauge .
What is VERY helpful is using LONG boards for sanding with COARSE paper ,say 40Grit
use a 1m board ,or 700mm length ,just take a flat piece of wood or thick plastic bord
put a upright strip on it so you can grab it with your hands and tack the coarse paper (from big rolls of sanding paper ,these are available in proffessional tool supplies around 140mm or 120 mm width) tack the sanding paper with double sided sticky tape (floor mounting) to the board.Only with long boards you will be able to work these big areas by hand without creating wavy and hollow shapes .Don´t use Rotary or orbital sanders !!!!

User avatar
greenpower dude reloaded
6
Joined: 29 Dec 2005, 20:03
Location: Portsmouth, UK
Contact:

Re: Over and Under or around the sides

Post

Image

Image

Well, Laura has really done herself a credit today, those pictures probably aren't a true representation. But the buck is getting very close now so I suspect it shaln't be long before we can look at taking a body from it! :D
______________________________________

Post Reply