F14T- a cardboard model

Post here information about your own engineering projects, including but not limited to building your own car or designing a virtual car through CAD.
User avatar
kosioBG
86
Joined: 20 Feb 2013, 11:31
Location: Austria

F14T- a cardboard model

Post

****Please scroll down to see newer posts****
List of reports:

#1- Starting the monocoque below
#2- Inside the monocoque
#3- Completing the chassis
#4- The floor
#5- Gearbox, Exhaust and Bodywork


Hi guys, on the 25.2 I started building a model of the F14T. Here is my first report.


Starting the cockpit
Here is the first piece:
Image
Then i added the nose base. It's a shame i didn't get the stepped shape, because i saw an image of it after i'd glued some parts and it was too late :( anyway, it won't be visible right there.
Image
The sides of the monocoque and nose follow:
Image
Glued to the base
Image
And adding the carbon texture and the white line on the underside.
Image

That's it for now, I'll appreciate comments or advise
Cheers :D
Last edited by kosioBG on 21 Mar 2014, 22:06, edited 6 times in total.

User avatar
Daliracing
4
Joined: 16 Sep 2013, 23:19
Contact:

Re: F14T- a cardboard model

Post

nice start :D it looks promissing :D

User avatar
turbof1
Moderator
Joined: 19 Jul 2012, 21:36
Location: MountDoom CFD Matrix

Re: F14T- a cardboard model

Post

Very nice! I'm making drawing of the front wing, endplates and cascades all seperately. Once finished I'll post them for you; perhaps it'll aid in that aspect.
#AeroFrodo

User avatar
kosioBG
86
Joined: 20 Feb 2013, 11:31
Location: Austria

Re: F14T- a cardboard model

Post

thanks for the positive comments! :D

User avatar
rohit1594
0
Joined: 27 Sep 2012, 13:45

Re: F14T- a cardboard model

Post

Nice! Looking forward to seeing the completed model! :)

User avatar
kosioBG
86
Joined: 20 Feb 2013, 11:31
Location: Austria

Re: F14T- a cardboard model

Post

Hi guys!
Here is my second report.

Inside the monocoque
To start, here are the pedals:
Image
Here you can see the pedals mounted. Also, there's the map of Melbourne on the right side. And an additional reinforcement rib at the very front of this pic.
Image
Next, the seat. It took me two attempts, but in the end I think it turned out nicely.
Image
Image
And here it is installed in place:
Image

That's it for now and thanks for watching! New updates soon!
Cheers :D

User avatar
kosioBG
86
Joined: 20 Feb 2013, 11:31
Location: Austria

Re: F14T- a cardboard model

Post

Hi again, here is my 3rd report

Completing the chassis

To start, I had to close the cockpit. Since I'll never have such good access to it later, I made the steering wheel. If you look closely, you can see the display and rev ligths, the buttons and the gear paddles.
Image
Image

That done, I cut out the top of the monocoque (and nose)
Image
and glued it in place:
Image
Next, the turning vanes. Not much to say about them, but you can see a slot at the front end. Also, note the TV cameras on top. I had to cut a little hole in the cardboard for them.
Image

And here it gets interesting. Sidepods. They consist of a layer of red on top and one black underneath, carefully shaped and curved.
Image
Gluing them in place wasn't easy, because they were flexing in the opposite direction, but eventually I got it. Also, I added the white line.
Image
Next, the head rest and protection + TV cameras
Image

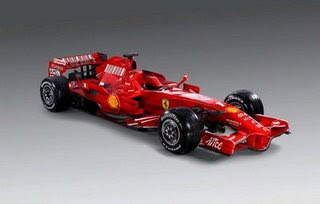
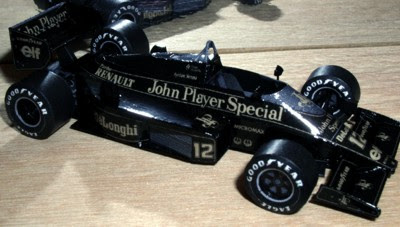
And the final thing I'll cover in this report is stickering. This time, I decided to print out the logos for more precision. I used Adobe Illustrator to prepare them- find the corresponding logo on the internet, trace it, change colours (if required) and then scale it. After printing, I cut them out, coloured the edges of the paper with a felt-tip pen (as Paul taught me) and glued them with a waterbased varnish that serves as glue. A layer of the same varnish followed. Next, I mounted the mirrors. Finally, I painted it with 2 layers of proper high gloss varnish. Here is the result:
Image
Image
Image
Image

I know that it isn't perfect, but I'm pretty satisfied with it. Next step- floor.

Comments are wellcome :D
Cheers :)

el-Magico
-10
Joined: 25 Aug 2013, 22:56
Location: The number above shows the current temperature

Re: F14T- a cardboard model

Post

Very nicely done!
Looking forward to the rest, good luck!
Quote of the year: "almost as sickening as the Velcro fluff under Lewis' cap..."

User avatar
Alonso Fan
10
Joined: 06 Apr 2013, 18:21

Re: F14T- a cardboard model

Post

Beautiful, absolutely beautiful! Very well crafted and already an improvement on your previous model.

keep up the good work, I'm looking forward to the next report...
SHR Modding
Youtube
Twitter
Discord

Sound Developer for Reiza Studios
Sound Modder for Assetto Corsa

User avatar
kosioBG
86
Joined: 20 Feb 2013, 11:31
Location: Austria

Re: F14T- a cardboard model

Post

Hi there, time for the next report!

Floor
After completing the cahssis, I started manufacturing the floor.
It consists of three cardboard main pieces, each with a slightly different shape to shape the diffuser and the splitter.
Image
Here they have become one:
Image
Next, I added the details on top of the splitter (the vertical thing at the front to be added a bit later)
Image
Next, the underside. Not many pics of that area, but still i got a shot of the wooden plank to use as reference. More info was to be found on the diff.
Image
The barge boards and the vertical thing followed. The santander logo was also glued in place and varnished.
Image
Even though some details are missing, I glued the chassis to the floor and added the vertical things at the end of the sidepods.
Image
Image
That's it for now. Next stop-gearbox. Luckily, there are some nice shots of it on the forum to help :)

Cheeres :D and don't forget to check for updates
PP enjoy Melbourne tomorrow

User avatar
Alonso Fan
10
Joined: 06 Apr 2013, 18:21

Re: F14T- a cardboard model

Post

Looking good :)

just one question, how are you looking to shape the engine cover and exhaust outlet/cooling outlets ?
SHR Modding
Youtube
Twitter
Discord

Sound Developer for Reiza Studios
Sound Modder for Assetto Corsa

User avatar
kosioBG
86
Joined: 20 Feb 2013, 11:31
Location: Austria

Re: F14T- a cardboard model

Post

not completely sure yet, but it will be something similar to my previous car. I'm planning to use 3 cardboard pieces and their overlapping shall be covered by logos. after completing the gearbox, i'll be at it

User avatar
idfx
53
Joined: 20 Dec 2013, 03:18

Re: F14T- a cardboard model

Post

Nice.
You know the software: Pepakura Designer ?
----------

User avatar
kosioBG
86
Joined: 20 Feb 2013, 11:31
Location: Austria

Re: F14T- a cardboard model

Post

wow haven't seen it, will definitely look into it!

User avatar
idfx
53
Joined: 20 Dec 2013, 03:18

Re: F14T- a cardboard model

Post

is a software papercraft.
Imagem Example
Image
Image
project ferrari: http://visualspicer.com/personal-work/f ... aft-racer/
Image
Image
Image
Image
Site: http://www.tamasoft.co.jp/pepakura-en/
Last edited by idfx on 15 Mar 2014, 16:06, edited 1 time in total.
----------