1:8 McLaren Honda MP4/4

Post here information about your own engineering projects, including but not limited to building your own car or designing a virtual car through CAD.
Post Reply
ajdavison2
30
Joined: 08 Dec 2010, 12:41

1:8 McLaren Honda MP4/4

Post

Hi everyone,

I've recently started a subscription to build Senna's MP4/4 in 1:8 scale. As it was his birthday yesterday I thought it would be nice to share the build with everyone here as it goes on. I'll include as many photos as possible of what I think is relevant or interesting, but if anyone has any specific photo requests please let me know.

I've done a 1:8 scale MP4/23 a few years ago which was fun, but I do not profess to be an expert model maker. So bearing that in mind I've done the best I can with my own impatience. :lol:

PS I'm also using this first post to test the image sharing as I haven't done it before on this forum.

Anyway, Issue 1, part 1 contains the start of the front wing assembly and the engine cam cover:
Image
Image

The assembly for this stage was straight forward, simply scraped some paint off of the contact points of the wing and nose box, and fit. I used masking tape to keep the parts together while the glue was drying.
Image
Image

Thanks for reading, Issue 1 part 2 will come later this week.

Alex

ajdavison2
30
Joined: 08 Dec 2010, 12:41

Re: 1:8 McLaren Honda MP4/4

Post

Hi Guys.

Finished doing issue 1 part 2, so here we go. This part is focusing on further assembly of the front wing and nose, as well as inserting the front wheel into the front tyre. The parts supplied with this part as as shown:
Image

Of particular interest to me was profile of the wing elements, mainly just because I enjoy little details like that.
Image

I found the most difficult part of this, (and I suspect that this will be a recurring theme) was using the provided mini screwdriver to tighten the screws without damaging the heads. I think going forward I will invest in a set of precision screwdrivers. The wing elements are all attached with screws, so there was no gluing in this stage. The wing itself can be adjusted through low, medium and high downforce positions which I found to be a nice little touch (the 3 small holes pictured on the right below).
Image

Due to some complications with the delivery I have accidentally ended up with 2 sets of parts for the front wing. So I plan to do one in high downforce (pictured below) and one in low downforce (which I'll assemble and post a comparison photo) to have on display next to it.
Image
Image
Image

That's it for now.

Cheers,

Alex

ajdavison2
30
Joined: 08 Dec 2010, 12:41

Re: 1:8 McLaren Honda MP4/4

Post

Hi everyone,

Issue 1 part 3 progress coming up. This part covers the assembly of the front left brake, and temporary assembly of the engine block. Parts included are shown below.
Image

Closer look at the front (outside face) of the brake disk:
Image

Closer look at the vented sides of the disk:
Image

Closer look at the rear (inside face) of the assembled disk:
Image

Closer look at the assembled brake caliper, inner, outer and pads:
Image

And a look at the temporary assembly of the engine block and engine front:
Image

That's it for this stage, not very detailed I know but the actual assembly for this was simple gluing and a couple of screws. Nothing that I found particularly noteworthy. If you would like to see anything extra included in the steps or detailed photos of anything else just let me know.

Cheers,
Alex

User avatar
nzjrs
60
Joined: 07 Jan 2015, 11:21
Location: Redacted

Re: 1:8 McLaren Honda MP4/4

Post

Very cool. If you wouldn't mind sharing - where did you get this model (subscription) from?

ajdavison2
30
Joined: 08 Dec 2010, 12:41

Re: 1:8 McLaren Honda MP4/4

Post

Certainly, it is the modelspace/deagostini model. They do a few different ones, I've previously built a 1:8 mp4/23 (2008 mclaren) and they also offer a 1:7 remote control RB7 which I might tackle after this project.

shingles
3
Joined: 28 Nov 2016, 01:59

Re: 1:8 McLaren Honda MP4/4

Post

Wow. The kit looks awesome.... but I just checked the prices. Pricey. But looks very impressive.

ajdavison2
30
Joined: 08 Dec 2010, 12:41

Re: 1:8 McLaren Honda MP4/4

Post

Hi everyone,

2 updates this week for you, you lucky bunch. Firstly the regular update from the next stage of assembly. Secondly I got round to putting together the 2nd front wing that I mentioned in stage 1.

So Issue 1 stage 4:
Supplied in this stage are the clutch disks and cover, the inner and outer brake calipers and pads for the continuation of the front brake assembly and the other rear wing endplate and rear wing stay to be assembled later.
Image

Clutch plates were simply slid into the cover and them screwed onto the front of the engine assembly, along side the cam cover and rear face of the engine. (As these assemblies are temporary according to the instructions some of the screws are not tightened)
Image
Image
Image
Image
Image
Image

That's it for the assembly of this stage. For the spare front wing I have ended up with I have done one in low downforce and one in high downforce. Assembly is just the same as part 1, except screwing them into a lower hole. I'm quite glad that I've ended up with a spare actually as it's a nice feature of the model and is fun to be able to display it without having to change the configuration of 1 wing. (And the screws are an absolute nightmare, even with the precision screwdriver set I've bought.)
Image
Image
Image
Image

That's it for this week folks. Cheers,

Alex

ajdavison2
30
Joined: 08 Dec 2010, 12:41

Re: 1:8 McLaren Honda MP4/4

Post

PS. The magazine has recommended applying an ink wash to some of the parts to give an added element of detail. Why this isn't done by default I'll never know, but when I get round to doing it I'll include it in the weekly update.

ajdavison2
30
Joined: 08 Dec 2010, 12:41

Re: 1:8 McLaren Honda MP4/4

Post

PPS. Yes that's a steering wheel in the background haha. If anyone plays F1 on PS4 I'll be down to go wheel to wheel sometime.

ajdavison2
30
Joined: 08 Dec 2010, 12:41

Re: 1:8 McLaren Honda MP4/4

Post

Hi guys,

Productive weekend on the model this week. Going to upload Issue 2 parts 1 & 2. This one is quite a good one, with an exciting detail covered later.

So first up, issue 2 part 1: Assembly of the rear wing. This part provided the 3 elements of the rear wing ( the main plane in 2 parts hence the 4 elements in the photo) as well as the nose cone for the front wing.
Image

Next 2 photos are the interim rear wing assembly while I test fitted stuff. As with the front wing I find it right interesting looking at the aero profiles of the wing.
Image
Image

Assembled rear wing at this stage, the wing was just assembled using glue for this stage. No screws needed. Also note the wing stay between the profiles.
Image
Image
Image
Image

Nose cone with the front wing tip on:
Image
Image
Image
Image

Issue 2 part 2: Continued assembly of the rear and front wings and some more engine parts to be used later. Parts included with this one are the rear wing stays, the front wing skid plates, engine plenum and plug caps.
Image

Close up photos of the plenum chamber:
Image
Image

Rear wing stays were simply glued to the underside of the main plane:
Image
Image
Image
Image

Same story with the front wing skids:
Image
Image
Image
Image

So the bit of the model I'm excited about which I've noticed is that the rear wing is missing the Marlboro sponsorship. after looking at the promo material for it and stuff that is on the magazines it doesn't appear to be anywhere. I'm guessing due to the tobacco sponsorship. But anyway I've found a set of 1:8 MP4/4 decals online with all of the original sponsors so I've promptly ordered those and will be putting them on as soon as. I think it'll be a really nice touch on the finished model.

Anyway, that's it for now guys. I'll check back in next week.

Cheers,

Alex

ajdavison2
30
Joined: 08 Dec 2010, 12:41

Re: 1:8 McLaren Honda MP4/4

Post

Hi everyone,

Postponing an actual build update this week in favour of asking advice. I've got the decals that I previously mentioned (Marlboro ones etc) but can't seem to identify them all properly from a combination of the decal sheet and images on google. I've attached a photo below with the references of where I think they go, as well as close up ones of the smaller decals. If anyone can fill in the blanks (in bold) it would be much appreciated. I'm unsure which of the logos will be on the final model, but from looking at the photos of it in the magazine and stuff I think it'll be all of the numbers, the Honda, Shell, Tag Heuer, driver names and Mclaren logos.
Image
1) numbers: Rear wing endplates and nose cone (numbers depend on which driver you configure it for, obviously I'll be using the 12s for Senna (already on the rear wing and nose cone as the model was supplied)
2) Powered by honda: Side of bodywork under the roll hoop (will probably be on the model when I get those parts, it's on the photos)
3) Red electric symbol on a blue triangle: No idea of location??
4) "Diecast magnesium, made in england" logos: No idea of location??
Image
5) E symbol: Fuel filter cover panel (will probably be on the model when I get those parts, it's on the photos)
6) Mclaren international: Nose cone (already on the model as it was supplied)
Image
7) Small Blue rectangles with yellow centres and black numbers x20: No idea what these are or where the location is for??
Image
Image
Image
8) Small Marlboro logo: No idea of location, possibly nose cone? But it doesn't appear to be on any photos that I can see from the real car.
9) Honda, Goodyear, and Shell logos: Nose cone (already on the model as it was supplied)
10) Shell logos: Sidepods (will probably be on the model when I get those parts, it's on the photos)
11) Goodyear logos: Front wing endplates (already on the model as it was supplied)
12) Prost/Boss logos: Roll hoop (won't be needed as the model I'm doing is the Senna version)
13) Shell logos: Outside front of sidepods under cockpit (will probably be on the model when I get those parts, it's on the photos)
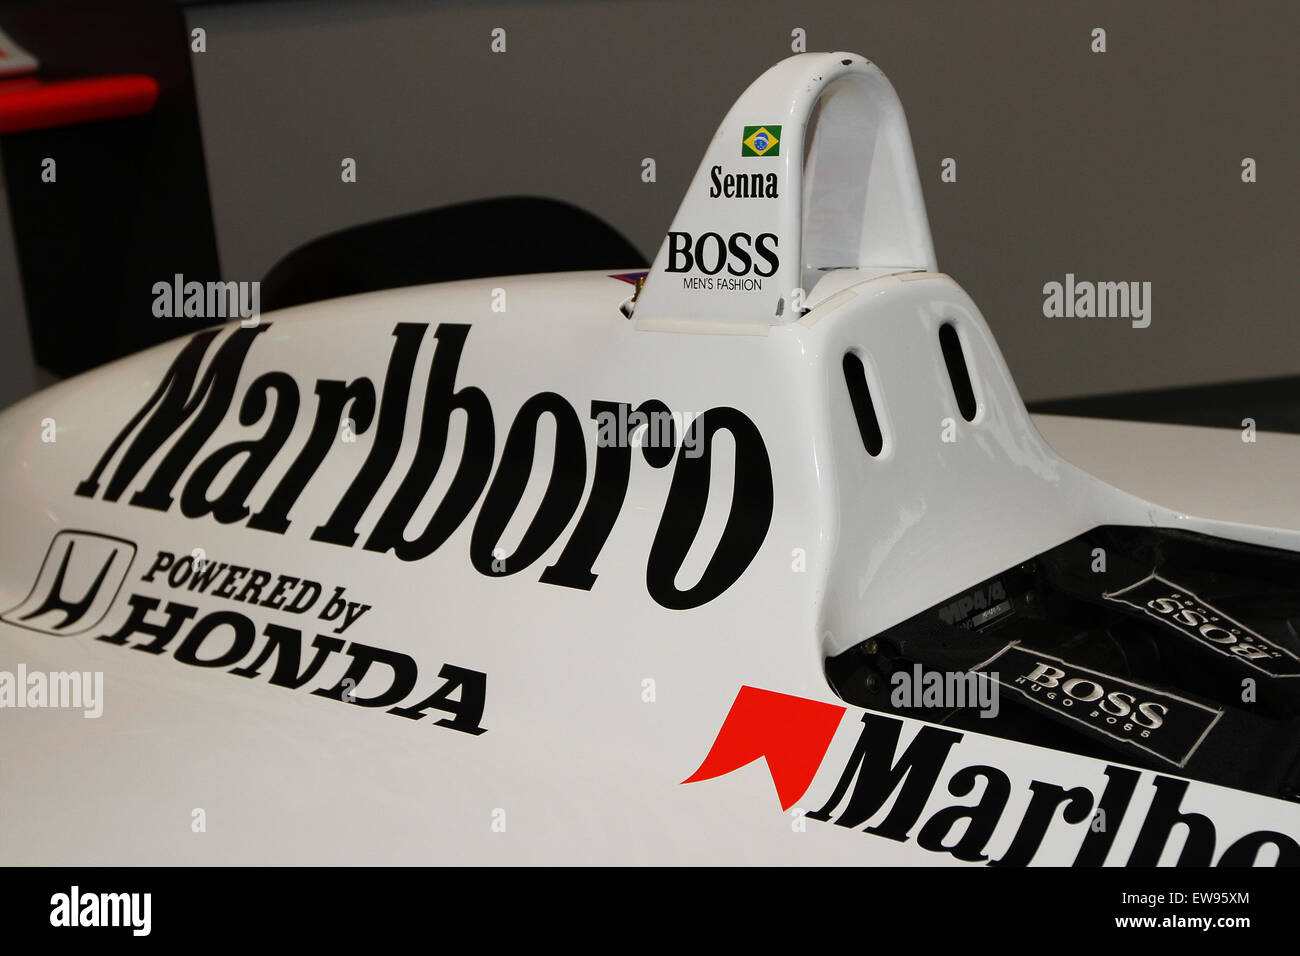
14) Senna/Boss logos: Roll hoop (will probably be on the model when I get those parts, it's on the photos)
15) Large Marlboro logo: Front of rear wing (the split in the logo makes it obvious)
16) SHOWA logos x4: 2 for lower rear wing endplates, no idea about the location of the other 2?? (lower rear wing endplate logos already on the model as it was supplied)
17) FIA logo: No idea of location, maybe inside the cockpit?? (Might be on the finished model?)
18) Large Marlboro logos x2: on the side of the body work, under the roll hoop but above number 2 on this list.
19) White Marlboro logo x1: I think this goes on the bare chassis underneath number 21 on this list, see 21 for photo ref.
Image
20) MP4/4 chassis number plate: I think this goes behind the seat? Or inside the cockpit?? (I can imagine this will be on the finished model??
Image
21) White Hercules logo: I've found photos online with this on the bare chassis above between the suspension mounting points. (Might be on the finished model when I get that part, who knows)
Image
Image
22) Marlboro logo with split in the "lb": Nose cone, based on the photo of the locations from the first image. The break line of the nose and chassis is clearly in the same place as the split in the "lb".
23) White Marlboro logos x2: Again from photo references online I think this goes on the bare chassis under the roll hoop. (see photo reference of 21)
24) Shell logos: Front wing elements. (Already on the model as supplied)
25) Marlboro logo with red elements: Rear of the rear wing, as per photo of the logo locations in the first image.
26) Marlboro logos with red elements x2: Side of the cockpit under opening in front of roll hoop in side elevation.
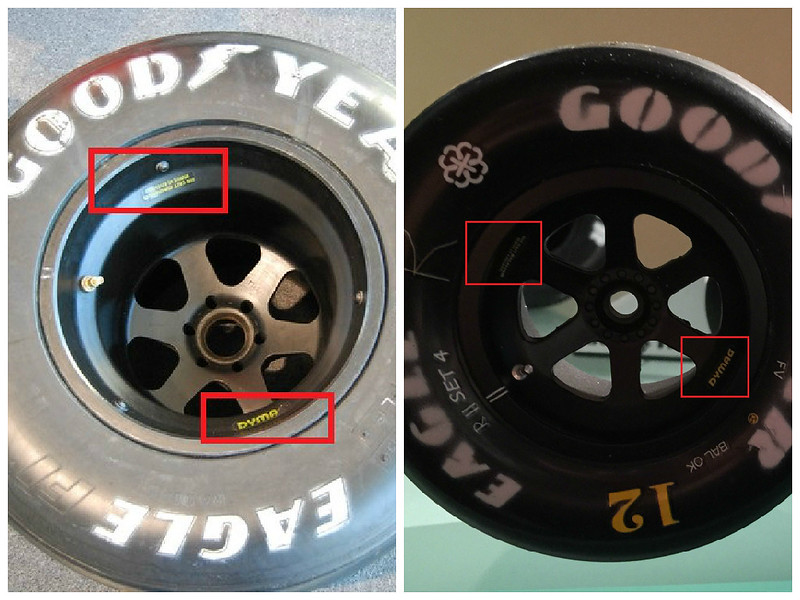
27) "DYMAG" logos: No idea what these are or where they're supposed to go??

Like I say any advice would be appreciated.

Cheers,

Alex

User avatar
1158
39
Joined: 06 Mar 2012, 05:48

Re: 1:8 McLaren Honda MP4/4

Post

#3 (Blue electrical triangle) goes just behind the role hoop. You can barely see it here...

Image

Found a better pic:
Image

User avatar
1158
39
Joined: 06 Mar 2012, 05:48

Re: 1:8 McLaren Honda MP4/4

Post

2 for 1 deal.

DYMAG and "Diecast magnesium, made in England" are for the wheels...

Image

The blue stickers with numbers look like heat stickers to me, could be wrong tho.

ajdavison2
30
Joined: 08 Dec 2010, 12:41

Re: 1:8 McLaren Honda MP4/4

Post

Thanks, that's very helpful. By coincidence your photo all helps me place the number 20 sticker behind the seat so thanks for that again. With the help of someone on Instagram called elektrobanks (check his page out he does loads of scale models. Really cool stuff, that photo that got shared of Hamilton's 2018 vs 2008 car was him) I've also managed to identify a few others as well. He also agrees that the number 7 stickers are temperature sensors, so if I can't find exact locations for them I'll just put some around logical places, exhausts, brakes, rear components, radiators etc.

smirkoff
5
Joined: 09 Aug 2008, 01:45

Re: 1:8 McLaren Honda MP4/4

Post

Hi! I did some alternative 3D printed parts for that kit, specially a new oil radiator, since the original kit part is very poor in detail. If you're interested, you can find the radiator here:

https://www.shapeways.com/product/C478T ... d=61393933

About the heat sensors, they were used mainly above the oil radiator and over the brake calipers. You can find references in this archive:

https://www.sendspace.com/file/q18t1t

Cheers,
Smirkoff

Post Reply