1:8 McLaren Honda MP4/4

Post here information about your own engineering projects, including but not limited to building your own car or designing a virtual car through CAD.
ajdavison2
30
Joined: 08 Dec 2010, 12:41

Re: 1:8 McLaren Honda MP4/4

Post

Haha not quite home yet, but yeah at the minute I'm really happy with how it's went, the fact that it's entirely removable and you can't tell the legs are cut when he's in the cockpit. I'm excited to have a go painting it, got the final layer of priming done at the weekend and I'll just need to give it a final rub before I put the red on, even though the chest area is slightly rough where I couldn't quite rub it down it won't matter once it's painted and belted into the car.

ajdavison2
30
Joined: 08 Dec 2010, 12:41

Re: 1:8 McLaren Honda MP4/4

Post

Hi guys, back again after a long break, hope you all had a good Christmas. I got plenty done over the break on the model. I've currently finished the model itself and the driver, and I'm working out how best do to the base. This week I'll be finishing off the driver updates, I'll get to posting the final car updates in the coming weeks.

So, as of last time I had the driver primed and sanded ready for the topcoat. To do the sponsor logos on the suit I had 2 trains of thought that I'd be able to put in place with no issues. The first was to mask off the logos as best I could and then try and draw/trace them on afterwards, my thinking being because they're so small and he'll be in the car it'll hardly be visible. This school of thought had positives and negatives as I'll get into. For information this is the main image I used as a reference point.
Image

So I masked off the primer and marked out the logos:
Image

Then I trimmed the masking as best I could and masked off the helmet ready for spraying:
Image
Image

Quick colour test :wink:
Image

Top coats (x 4) done:
Image
Image

Helmet masking removed:
Image
Image

I then decided to completely do the helmet before moving onto the logos, so I masked off the torso to avoid accidently getting yellow on the suit. Shown below is the masking and 1st coat of yellow on the helmet, you can see I was right to mask off the helmet as the yellow would not have covered the red very well. 1st photo is the main reference photo I used. Visible on the 3rd photo is where I had smoothed off some of the primer that had dripped while it was drying:
Image
Image
Image

Overall took about 5 coats of yellow I think:
Image
Image

Next up I masked the stripes off on the helmet. I appreciate that the real helmet has a white border on the stripes but there was no way my skills were up to that so I've done them single colour. This was quite tricky to mask as I had to get the stripes as straight as possible, however the helmet is curved and the masking tape is straight so it was quite tricky to do without it creasing and folding in places, you'll notice what I mean on some of the photos particularly where you can see the back of the helmet:
Image
Image
Image

And then I did the famous Senna stripes, this took about 4 coats:
Image
Image
Image
Image

After this was dry I removed the masking on the stripes, you can see some areas that required touching up (unavoidable really) but overall I was quite happy with how they turned out:
Image
Image
Image
Image

Next up I decided to take the masking off the torso and have a look at the logos. As the majority of the helmet paint was done at this point I decided it would be fine. You can see below that the colour contrast was excellent between the red and white, however they weren't straight or regularly shaped. Long story short I couldn't live with it when I had a better solution in mind haha:
Image
Image

So I touched the suit up with the same red paint to hide the masking, the edges are still a little visible but only really if you look at them in the right light. I also used this stage to touch up the helmet stripes to get them as neat as I could by hand, very difficult work as you can imagine, especially I wouldn't say I have the steadiest of hands but overall I was happy with them:
Image
Image
Image
Image

I also took the decision to paint the face and and lining of the helmet (even though I fully intend to permanently cover it with a visor):
Image
Image

Next up I went for the suit logos. Now, because the model has been chopped and changed and it's quite hard to find exact logos and sizes etc I made a sheet (standard printer A4 paper) with loads of different sizes for the suit and helmet logos, I used some best estimates and then my plan was to use whichever combo I decided looked best:
Image

I won't post individual photos after every decal, so I'll post just post the below. The way I stuck the decals on was just to use regular transparent drying PVA glue as a paste. This was used to make the A4 paper logos flexible enough to follow the contours of the body without damaging the ink as it's a non-solvent based glue. I then pasted over them to seal them onto the body. I'll be honest, this actually turned out really well. I was super happy with how neat they looked, definitely the far better option than my initial idea:
Image
Image
Image
Image
Image

After this I moved onto the helmet stickers, this was a little bit more difficult as the curvature of the helmet meant it was harder to get the stickers to stay attached without using more glue, which although it leaves the ink ok, damages the integrity of the paper so you only get a couple of chances to move it before it'll rip. Anyway I also decided to try and do the eyes with hilarious results. As you can see below they are truly truly horrifyingly awful :lol: :lol: :lol:
Image

And then the helmet logos. (Note the nacional logo will be touched up):
Image
Image
Image
Image

And after touching up:
Image
Image
Image

And next my plan for the visor. Now I originally had a visor for it but somehow I've managed to lose it, quite inconvenient as it's so awkwardly shaped. What I did was to use the visor from the original massive model as a template. I pushed some A4 paper into the inside of it and traced it, this would allow me to get the scale correct and
in particular translate the curvature from a 2d to a 3d surface accurately. So I traced the large visor, measured key points and dimensions and scaled it down using graph paper. Proper old school pen and paper reverse engineering. I'm expecting the call from Aston Martin to work on the 2022 car any day now to be honest.
Came out with the following template:
Image

Which I then transferred onto some plastic packaging and cut to shape:
Image

This was then covered with a a PVA/silver paint mix to give a translucent semi-reflective surface:
Image

And peeled off and trimmed again, you can see here the translucent effect I was going for:
Image

And this was then superglued onto the helmet, shown here with the steering wheel as I was using it to assemble the car model concurrently, this was actually quite hard as I had to find a wat to hold the visor in place without getting any glue leaking onto my fingers. Even the tiniest amount of glue could've ruined the finish on the helmet:
Image

And that's it for today guys. Next update will be covering some of the finishing of the car, there was more to it than I anticipated so I'll break it down.

Thanks for reading as usual.

Cheers,

Alex.

User avatar
flynfrog
Moderator
Joined: 23 Mar 2006, 22:31

Re: 1:8 McLaren Honda MP4/4

Post

A little late but this type of tape works better for masking curves and giving a clean edge. You can stretch it a little to prevent the wrinkling problem you were having and a razor blade leave a sharp cut edge. https://www.3m.com/3M/en_US/company-us/ ... 138&rt=rud

User avatar
strad
117
Joined: 02 Jan 2010, 01:57

Re: 1:8 McLaren Honda MP4/4

Post

Some nice work Alex. The painters tape works well so I agree with FlynFrog on that.
For a change I do have a criticism. I would have used my airbrush to paint the torso and helmet. You could score one fairly cheap and with just a little practice with pressure and tip you could lay down a cleaner, smoother look and with the painters tape you could get crisper lines and edges. Of course there would be the expense of a small compressor. Mine cost under $100 for each.
But overall far better than I could do and way more patience than most of us... especially me.
Really like the translucence of the visor. 👍
Please don't take that criticism personally. You've done a great job.
To achieve anything, you must be prepared to dabble on the boundary of disaster.”
Sir Stirling Moss

ajdavison2
30
Joined: 08 Dec 2010, 12:41

Re: 1:8 McLaren Honda MP4/4

Post

Hi Strad & Flynfrog,

Not at all, I welcome people's thoughts and ideas on projects. I agree I would've preferred a better finish, but I couldn't justify the cost for a single project, and due to not having much familiarity I wasn't sure how well it would turn out etc. I would've particularly liked a smoother finish on the helmet but I couldn't get the logos on and have a glass smooth finish. If I was to do it again, factoring in the cost and time I've spent re-working the model, painting, finishing it etc I would've just commissioned a complete and painted model from where I got it 3d printed from. But hey, it's always easy to say in hindsight what we would and wouldn't have done haha! I think when you see the photos of it in the car it looks ok in my opinion.

User avatar
strad
117
Joined: 02 Jan 2010, 01:57

Re: 1:8 McLaren Honda MP4/4

Post

👍
Way better than I could have done.
As I've said I have done many models and more than one has wound up in the bin out of frustration.
To achieve anything, you must be prepared to dabble on the boundary of disaster.”
Sir Stirling Moss

ajdavison2
30
Joined: 08 Dec 2010, 12:41

Re: 1:8 McLaren Honda MP4/4

Post

Hi everyone,

Back again for the final update of the car build. I wanted to keep this until I had the display done, hence why it's been so long between updates (I've actually had the car done since xmas), but due to lockdowns and stuff where I am I haven't been able to get to any hobby shops to get the materials I need, and I need to see what I'm buying so I don't want to buy online. Anyway I'll do that as an update as and when I can.

Just as a recap, the last car update I posted was the assembly of the body shell and electrics. This update will cover the final assembly of the model as well as the decals.

So, stage 70 - Completion of the model. Parts supplied with this issue were: windscreen (1), sprue containing silver air valves and black aerials (2), sprue containing top body washers (3), fuel filter cover panel (4), right and left lower rollhoop (5), tail light lens (6) & top body decal sheet (bottom). I've also included photos below in greater detail for the smaller parts.
Image

Tail light:
Image

Top body washers:
Image

Windscreen, valves and fuel filter cover:
Image

Parts required from previous stages:
- All of them (lol).

Firstly, stage 70.1 - Labels, decals & minor bodywork. The labels and decals presented several problems throughout which I'll try and highlight as I go.

First, the plate labels were applied to the turbocharger.
Before:
Image

After:
Image

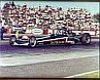
Next the chassis plate label was stuck to the monocoque. On a side note, just to refresh all of the labels were attached using only water. The process is that you soak them until the label self removes and then you lay that on the surface and wait for it to dry. I pushed them all in place with cotton buds (Q-tips I think for any American readers?) and tissue roll. The chassis plate label shown below (MP4-4-2) was the chassis number used by Senna at the 1988 Japanese GP.
Image

Next the rollhoop assembly was glued onto the lower left and right rollhoop components, there was a left and right on these and they could arguably of been fitted both ways so care was taken to get these in the correct orientation. Shown below next to their respective sides:
Image

Right side glued on:
Image

And left side:
Image

And then this assembly was glued onto the monocoque. Before:
Image

After:
Image
Image

The eagle eyed above you will notice that the chassis plate label is different to the one posted at the start of 70.1 I initially misplaced the label with the chassis number on (the one supplied with the magazine itself,) however the set of decals I bought way back when that included all of the Marlboro sponsors (more on this soon as well,) also had a chassis plate label on so I initially used this one and swapped them when the original turned up as I wanted the chassis number on the car.

Next up, the start of the bodywork decals. In hindsight it would've been prudent to ignore the magazine and do all of these last as it proved very difficult to handle to model without occasionally damaging the decals, where this happened I repaired them as noted below.

The labels supplied with the magazine had a lightly dotted border as an alignment guide so this is visible on some of the photos below, but you'll notice they disappear at stages. This is just because I trimmed them after they had dried. First up was the Honda logo on the engine cover. Before:
Image

After:
Image

Both sides done. I tried very hard to get them symmetrical:
Image

And next the SHELL logo on the sidepods, these were slightly trickier as the seam in the body work meant it was difficult to get the decal to lie completely flat. Visible also is the dotted line I mentioned, with the trimmed stage below:
Image
Image

Next the windscreen was glued to the cockpit cover. Before:
Image

After:
Image

Tail light lens was glued onto the tail light. Care was taken to use a very small amount of glue to avoid excess making it look messy:
Image
Image
Image

And then the top body washers were removed from their sprue and threaded onto the correct screws. Fiddly doesn't even cover it. Shown below for scale. The washers were plastic, so as you can imagine they were very delicate. A few did get damaged later on in the assembly, but I don't think it's noticeable.
Image
Image

At this stage I also decided to do the monocoque decals:
Nose cone before:
Image

After:
Image

Survival cell before:
Image

After:
Image

Both sides (you'll notice slight damage to the right hand side):
Image

After this aerials were glued onto the fuel filter cover panel:
Image

And this was glued onto the monocoque. Before:
Image

After:
Image

Next up the valves (1st image below) were removed from the sprue and glued to the wheels. (2nd image before, 3rd image after).
Image
Image
Image

Believe it or not that was all 70.1. I took this chance to do the bodywork decals, now a pleasant surprise the model actually came with a second sheet of decals which funnily enough has all of the letters and logos one would need to put Marlboro sponsorship on the car. Obviously their way of letting customers do so, without actually selling them Marlboro decals:
Image

First up, the cockpit logos: As you can see below I accidently damaged right right hand side one, this was repaired later which I'll mention:
Image

Engine cover logos (I loved these ones, really set the car off):
Image
Image
Image

After this the side panels were glued onto the bodywork. Before:
Image

After:
Image
Image

Repair job to the right hand side monocoque decal:
Image

Right, that's quite a lot for today as I don't want to bore you all more than necessary haha. I'll continue with the rest of this update this week or next.

Thanks for reading.

Alex.

User avatar
strad
117
Joined: 02 Jan 2010, 01:57

Re: 1:8 McLaren Honda MP4/4

Post

As usual nothing but compliments. Great work Alex. Great attention to detail.
Can't wait to see it setting in it glory.
To achieve anything, you must be prepared to dabble on the boundary of disaster.”
Sir Stirling Moss

ojlopez
5
Joined: 24 Oct 2014, 22:33
Location: Guatemala

Re: 1:8 McLaren Honda MP4/4

Post

Simply amazing. Amazing job and amazing model. Congratulations on building it, your skills are top notch.

ajdavison2
30
Joined: 08 Dec 2010, 12:41

Re: 1:8 McLaren Honda MP4/4

Post

Hi everyone, this project hasn't died I've just had a mad few months haha. Will be posting the final build update for the car next week, and then the display in the coming weeks after that!

User avatar
mclaren111
272
Joined: 06 Apr 2014, 10:49
Location: Shithole - South Africa

Re: 1:8 McLaren Honda MP4/4

Post

Stunning Job... =D> =D>

Post Reply