Pneumatic valve train prototype

All that has to do with the power train, gearbox, clutch, fuels and lubricants, etc. Generally the mechanical side of Formula One.
Brian.G
Brian.G
334
Joined: 10 Dec 2010, 23:52
Location: Ireland

Re: Pneumatic valve train prototype

Post

Brian, yep, have seen some seals, they resemble power-steering type square seals found in the column/rack valve bank around the torsion rod.

Thanks also, replied,

BG
If you think you cant, you wont, If you think you can, you will

Brian.G
Brian.G
334
Joined: 10 Dec 2010, 23:52
Location: Ireland

Re: Pneumatic valve train prototype

Post

This is happing a bit slower than my normal 'slow' pace, but the day job is very involved this weather, but thatll ease soon.

Below is the basic layout of test jig. Its moreso a casting drawing, than the plunger/pneu setup since these are on another drawing, but It will give you an idea, and me an idea when making the patterns.

Also pictured are retainers and lash caps I bought in to use on a 7mm test valve. Some of these parts will be integrated into the piston plunger. A very big thanks to Mike Guidera for sorting these with me.

Image

Image

Image

Image

Image

Image

More sometime soon once I complete drawings,

Brian,
If you think you cant, you wont, If you think you can, you will

User avatar
humble sabot
27
Joined: 17 Feb 2007, 10:33

Re: Pneumatic valve train prototype

Post

I'm excited to see the work you do on this project!
the four immutable forces:
static balance
dynamic balance
static imbalance
dynamic imbalance

Brian.G
Brian.G
334
Joined: 10 Dec 2010, 23:52
Location: Ireland

Re: Pneumatic valve train prototype

Post

Thankyou, Ive been insanely busy the last few months with the day job and just getting back into things now.

Brian,
If you think you cant, you wont, If you think you can, you will

User avatar
Onch
0
Joined: 21 Feb 2011, 12:01
Location: somewhere in Belgium

Re: Pneumatic valve train prototype

Post

What a nice project! =D>

A few comments from my side:
- the follower looks good! However, you might want to make it a bit thicker (or use a stiffer beam profile) to avoid it bending too much under load, especially when the cam contact point is between the follower pivot and the valve contact point...
- The contact point between follower and valve is normally slightly offset laterally so that the valve is somehow forced to turn during the lift. Not possible to see on the pics if you have accounted for this already.
- The rotation direction of the camshaft with respect to the follower will have an influence on the dynamic behaviour of the system. The easiest is probably to foresee that the shaft can be operated in both directions (is this has not been planned already).
- AFAIK no 'regular' displacement sensor can be used to measure the complete valve lift a valve: sensors that cover 15-20mm range need a much wider target, and sensors that can track a target the size of a poppet have a range of a few mm at best. You need a proper laser velocimetry system ($$$), and even then when you start to really approach the limits the instantaneous acceleration of the valve might become too high for the laser to keep track of it...

Hope this can be useful,


Olivier

jrobson
jrobson
0
Joined: 16 Jan 2012, 12:17

Re: Pneumatic valve train prototype

Post

Hi

I'd go for bucket rather than a follower? Getting a proper cam ground on a follower for that RPM will require quite a bit of $$$, placement of the pivot point, lobe profile, finger design etc all needs to be looked at, buckets are simple.

There are high temperature, high speed seals that will work, it's not really difficult to design the problem is operation, PV's only live an a very clean environment. The restrictor size is 1mm.

Gluehead
Gluehead
0
Joined: 05 Feb 2012, 21:37

Re: Pneumatic valve train prototype

Post

Something to keep in mind as you get farther into the design. The cam lobe profile and the weight of the moving assembly makes a huge effect on the rpm the valve will go into float or bounce on the spring seat. Done correctly 14k+ is doable with a standard valve spring. Buckets are easier to figure out as the ratio depending on if flat or domed is easy to sort out. Finger followers usually have profiles that gives the valve lift a variable ratio. This needs to be taken into account when designing the lobe. The plus side is the weight at the tip is very light vs. some buckets.
So I guess what I am saying is don't take for granted that part of the design. We've done designs in past that would float the valves at 12k and beat the daylights out of the valve & seat. Then came up with a profile that needed less seat & open pressure and would rev to 13k. We were limited to 12k (rules) but the improvement was less drag, more power and more fuel efficient.

elmerfud
elmerfud
0
Joined: 04 Feb 2008, 12:46
Location: Dandenong

Re: Pneumatic valve train prototype

Post

Hi Brian, a guy on cnczone built one but never finished his thread with the results. (but rumor was he got it running)
I used to work press tooling and they had pnuematic spring cannisters using for lifting the strip away from die.
These units are pre charged and not serviceable, they are swagged shut.
If you released the gas pressure and machined of the swagging in a lathe, you could copy the design replacing the steel for titanium.
Being non serviceable the viton seals you may have to mold yourself, it would be a simple die mold to make (lathe, drill press), as for curing time and heat ranges / molding pressures you would need to research.

http://www.dadco.net/
http://www.hysonproducts.com/

It baffles me why pnuematic valves are not more widely used when the system is so straight forward. (motorcross or go karting??)

User avatar
Pierce89
60
Joined: 21 Oct 2009, 18:38

Re: Pneumatic valve train prototype

Post

Brian.G wrote:Hello folks, I thought Id post this here as some maybe interested.

My intent is to find out all I can about this device by building a prototype.

My main goal is to see If I can build a reliable item. I have done as much research and thinking as I can for a few yrs. It is now time to build an actual item to start testing on.

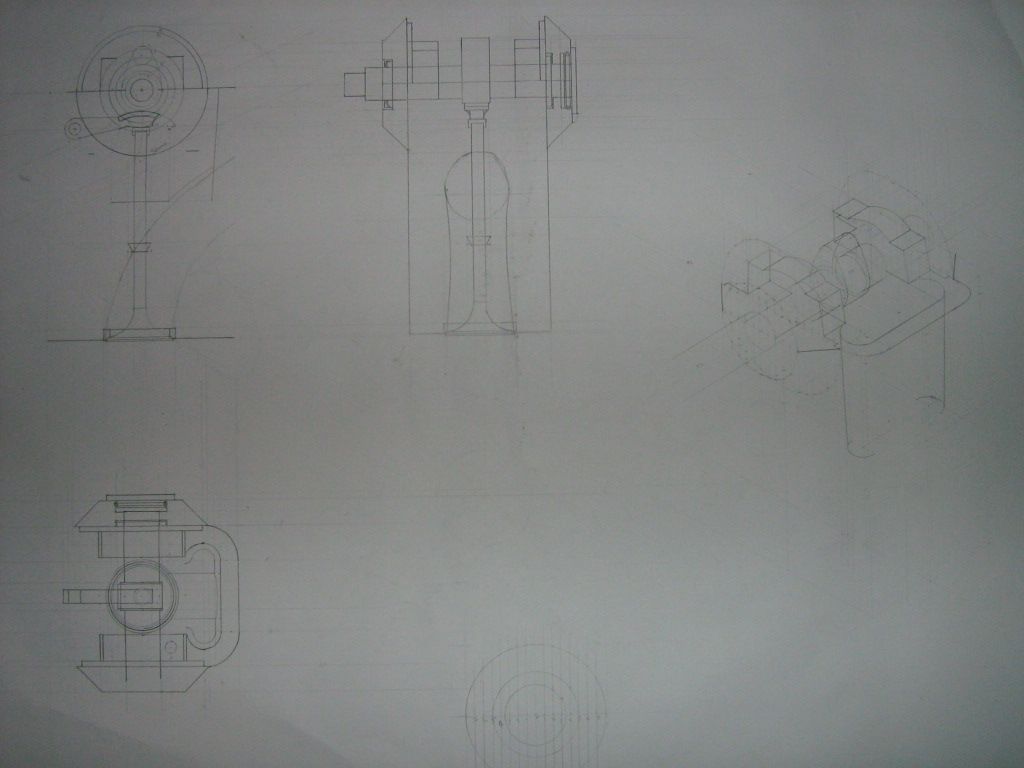
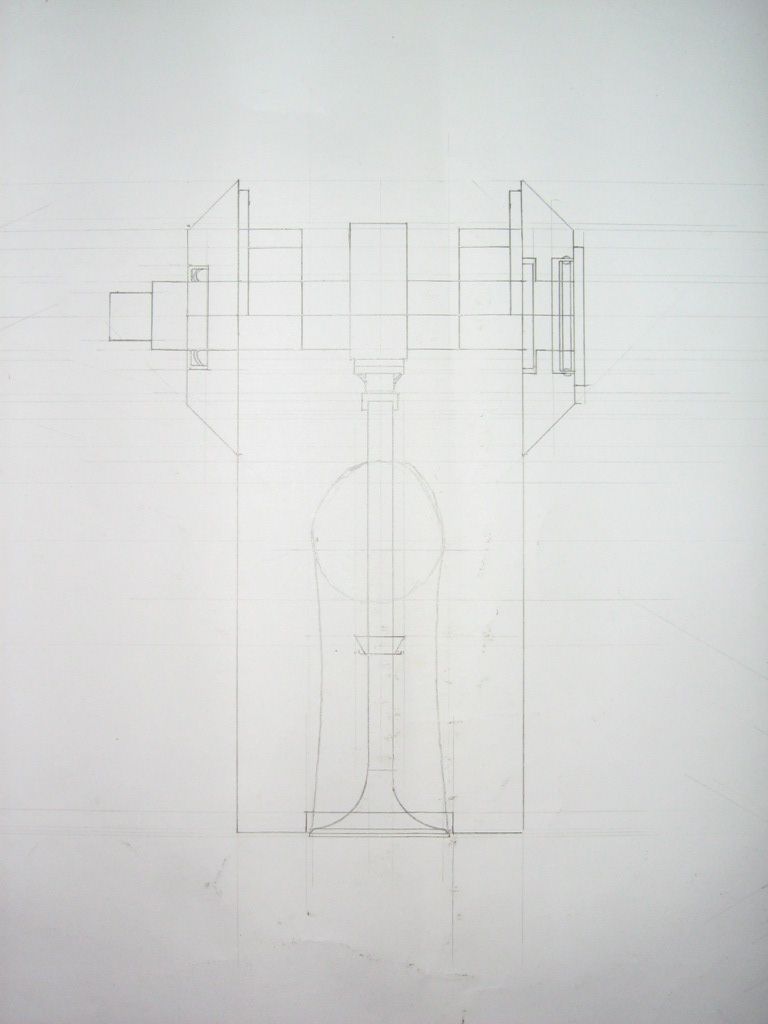
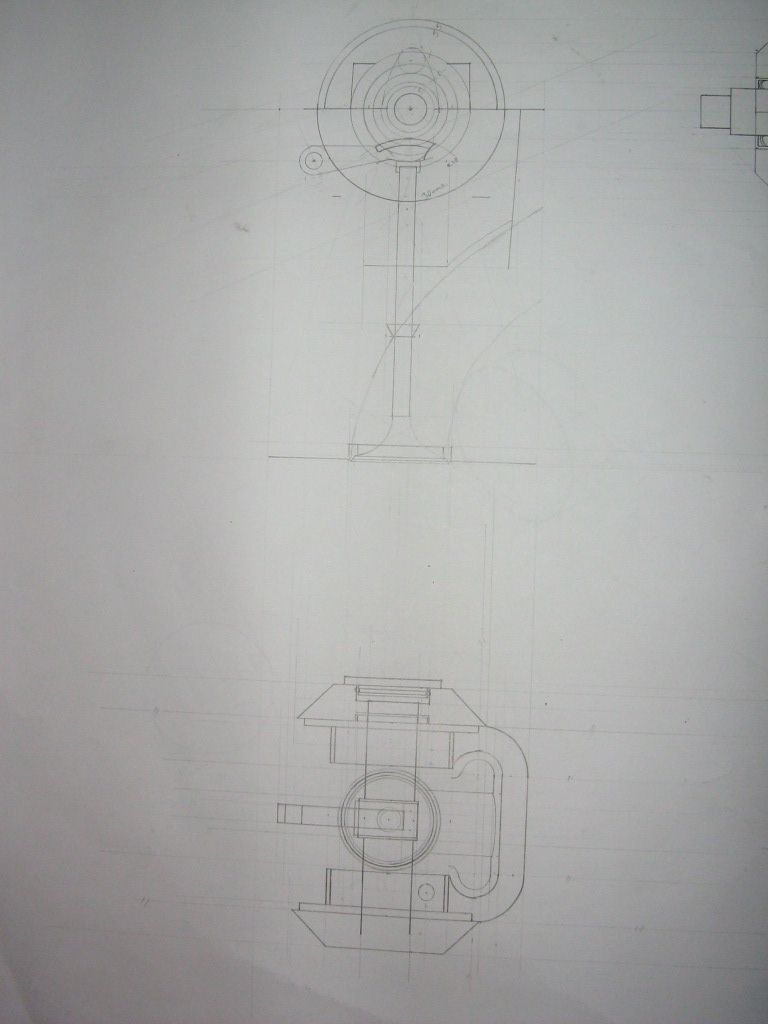
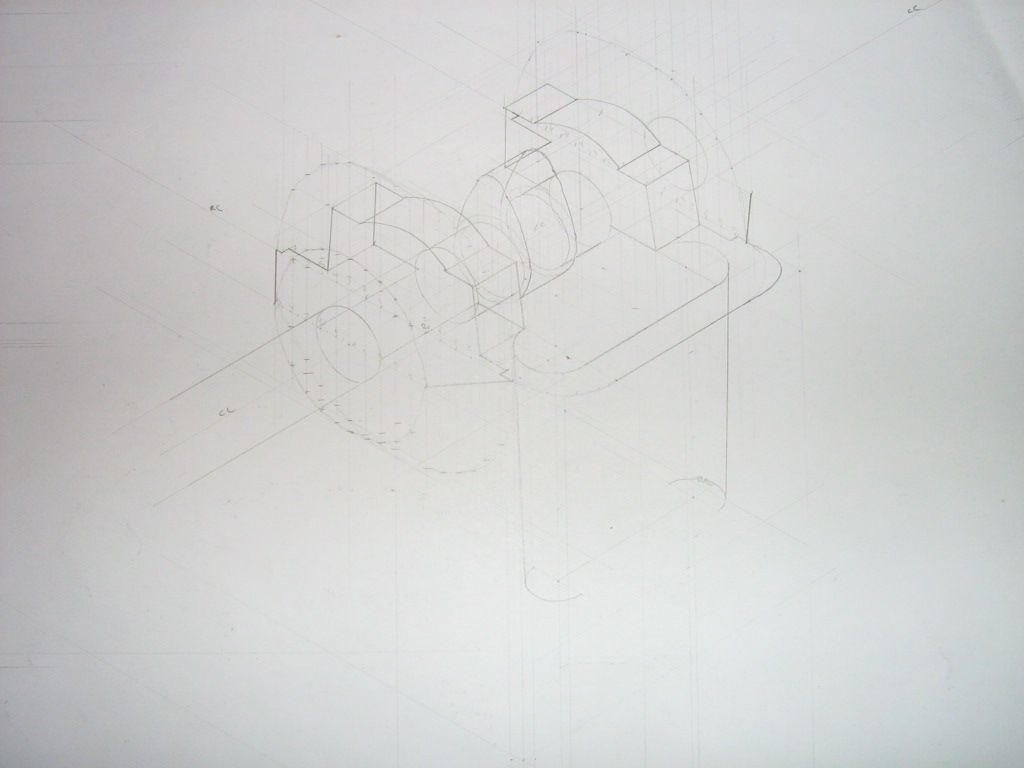
Ill be designing and making everything in house. Its a pretty simple test jig really, imagine just one valve and parts cut from a head, thats what It will resemble.

Since NO information exists on these, it is the only way to develop one. Ive read all the usual stuff. I thought of buying one off DelWest for testing, but they dont supply anything, instead design from scratch for your needs, at a cost of around 300K.
Nobody is will to share Info either, which I guess is ok, Im sure they have signed a ton of NDAs.

A fast rundown of the parts in mind.

A 40mm valve. Ill be turning this from Ti to have weights within what I hope to use later on. Its going to have a 7mm stem for the time being. I may waist it down in the port area for lightness.
The main body will be a cast housing.
The plunger will be Ti.
The piston housing will be an alloy sleeve, hard anodised in some xxxx spec I have to pick yet.
The finger follower will be steel. Im not putting that much design work into the follower geometry as yet, I simply want it to function. Although it will be designed in such a way as to prevent/minimise valve stem side loading.

Ill be cutting/grinding the cam also. The lift will be around the 15mm mark.

For the collet/retainer, I may make these, but Ive some on order from ducati which Ill look at first.

My target rpm is around 15-18krpm.

It will be oiled with an aux oil pump and assembly. Ill also probably heat the oil to around 120ish.

The guide will be silicon bronze of some sort.

My main concern at the minute, is getting some oil to the stem given that there is an 'air tight' seal there. But Ill figure it out in time. And also plunger galling to the bore walls.

I dont know how long its going to take, and I dont care, something to pass the time in the evenings right...

To view the valve contacting seat at high rpm, and to make sure its not bouncing Ill be monitoring it.
I haven't made up my mind just how yet, but its simple once I do so.
My options are
Stroboscope.
Proximity sensors coupled with an oscilloscope.
Fiber-optic interferometer.

Obviously these setups range in cost vastly, so perhaps Ill start with the strobe, and some for of macro viewing/capture device(camera)

Im doing all drawings and calculations on paper with pencils, so it takes a while. But, Im ok with drawing boards.

The reason for doing all the above is to develop a usable valve train for use in a single cylinder 4 valve test engine. This engine will have a bore of 98mm, and a stroke of 39.7mm. Target rpm is 15.5-16krpm.
I will use this to study a variety of things but mainly con-rod design, and journals.

The test engine is a while off, since I have only started drawing it about two months ago. You cant imagine all there is to think about in something that is technically a glorified lawnmower engine. But, Ill get there.

I hope it will interest some, as its what I wanted to do for oh...20yrs now...

Materials are not particularly dear either for the valve assembly, I cant even remember what they cost. The dearest thing is time, but thats free if its your own to pass.
Brian.G
This sounds so incredibly cool for a garage project type thing, even though your resources seem to have pushed it past "garage" point.
Last edited by Pierce89 on 20 Mar 2012, 07:35, edited 1 time in total.
“To be able to actually make something is awfully nice”
Bruce McLaren on building his first McLaren racecars, 1970

“I've got to be careful what I say, but possibly to probably Juan would have had a bigger go”
Sir Frank Williams after the 2003 Canadian GP, where Ralf hesitated to pass brother M. Schumacher

User avatar
Pierce89
60
Joined: 21 Oct 2009, 18:38

Re: Pneumatic valve train prototype

Post

Martha39 wrote:Piston and seal at first, but Ill try anything until I reach my targets, no matter what it takes.
Brian G. ?
Last edited by Steven on 03 Apr 2012, 23:39, edited 1 time in total.
Reason: Removed hidden image
“To be able to actually make something is awfully nice”
Bruce McLaren on building his first McLaren racecars, 1970

“I've got to be careful what I say, but possibly to probably Juan would have had a bigger go”
Sir Frank Williams after the 2003 Canadian GP, where Ralf hesitated to pass brother M. Schumacher

Brian.G
Brian.G
334
Joined: 10 Dec 2010, 23:52
Location: Ireland

Re: Pneumatic valve train prototype

Post

Digging this back from the dead, I am continuing in the new year. I had to park it, as without a cnc it made visualizing all my ideas into real form very tough. This was true for many of my prototype works.
Thankfully, due to a nice rise in my 'real work' last year, I have now purchased a cnc milling machine, complete with 5k in tooling. Its been a steep learning curve, as I wasn't familiar with cncs, or infact cam before this, other than pointing at paths and drawings and telling others to 'change here', or 'do this first' but both myself, and the cnc mill are now flying it in terms of making things.
Before I can start, I just want to finish up my self built 4+5th axis so Ill be as free as a bird in machining terms.

The fact that I can cast parts, and also cnc mill now opens up possibilities greatly.

Thanks all, Happy Christmas, and have a great new year whatever it holds.

Brian,
If you think you cant, you wont, If you think you can, you will

User avatar
Nowhereman
0
Joined: 27 Jun 2011, 23:52
Location: USA

Re: Pneumatic valve train prototype

Post

I admire the energy going into this prototype but, why not eliminate the cams too?
Lets go to an electromagnetic actuator built around the valve itself.
No camshaft, just a cpu that is montitoring the crank speed and position.
That will be more than fast and accurate enough to run any valve train at any realistic RPM level.
No matter where you go, there you are.

Brian.G
Brian.G
334
Joined: 10 Dec 2010, 23:52
Location: Ireland

Re: Pneumatic valve train prototype

Post

Nowhereman wrote:I admire the energy going into this prototype but, why not eliminate the cams too?
Lets go to an electromagnetic actuator built around the valve itself.
No camshaft, just a cpu that is montitoring the crank speed and position.
That will be more than fast and accurate enough to run any valve train at any realistic RPM level.
Based on a lot of studies, the technology needed is heavy, energy consuming, and would also feature a lot of mass at the top of engine, where you least want it in the line of coils and what not. Plus, from where I see it, if you want a really light armature(the valve) your control surfaces are limited by the diameter of the valve stem. If you do not want to use valve as armature, but instead drive from overhead with a larger armature, you still need a spring return in there someplace on the actual valve. That, or somehow connect the valve tip/lashcap to the end of the control armature - not easy.
I would also say that you would at least need an on board voltage of 25-30v.
I think this is where high rpm electromagnetic actuators fall down in terms of valve actuation, the larger armature has mass as you know, so inertia becomes a problem when tight control is needed. The system is also very susceptible to heat, and like a stepper motor, the valves would require the coils being on to keep valves closed too, if you some way got around not using a return spring.
Im sure camless electromag works in some applications, where rpm isnt that high and where full modelling of the open/close characteristics of valve is desirable, but that is not the case here, this is really about high rpm, as in 13krpm plus, or whatever anyone tells you is the highest figure a spring can reach.

Brian,
If you think you cant, you wont, If you think you can, you will

User avatar
PlatinumZealot
559
Joined: 12 Jun 2008, 03:45

Re: Pneumatic valve train prototype

Post

Brian.G wrote:Digging this back from the dead, I am continuing in the new year. I had to park it, as without a cnc it made visualizing all my ideas into real form very tough. This was true for many of my prototype works.
Thankfully, due to a nice rise in my 'real work' last year, I have now purchased a cnc milling machine, complete with 5k in tooling. Its been a steep learning curve, as I wasn't familiar with cncs, or infact cam before this, other than pointing at paths and drawings and telling others to 'change here', or 'do this first' but both myself, and the cnc mill are now flying it in terms of making things.
Before I can start, I just want to finish up my self built 4+5th axis so Ill be as free as a bird in machining terms.

The fact that I can cast parts, and also cnc mill now opens up possibilities greatly.

Thanks all, Happy Christmas, and have a great new year whatever it holds.

Brian,
Wow, if the tooling costs 5k, the machine it's self is like what? 40k or more?
🖐️✌️☝️👀👌✍️🐎🏆🙏

Racing Green in 2028